Well ive been very naughty recently, and treated myself to some new pet papers & stickers, well i was very low on them, hee hee. the papers i bought are, ( brazil, karen foster, sandylion, hot off the press br acetate overlay(dog) and cardstock, black, white. br burgundy 8x8 cardstock. the stickers are br sticker sheet dog words, creative imaginations 12x12 sticker sheet br dog bites and karen foster resin rounds br pets stickers. bellow are the lo's i made from this new stash. i often make my own frames, what i do is when ever i buy frames i make a template of them so i can make my own frames in future, using up my pattern paper scraps and cardstock scraps. i also do this for making my own tags. the adhesives i use are, double sided tape, glue dotes ( for attaching buttons), and sticky foam squares mini.( i hate glue its too messy). thanks for reading my blog, and for the lovely comments. xx
Friday 20 February 2009
MY NEW STASH
Well ive been very naughty recently, and treated myself to some new pet papers & stickers, well i was very low on them, hee hee. the papers i bought are, ( brazil, karen foster, sandylion, hot off the press br acetate overlay(dog) and cardstock, black, white. br burgundy 8x8 cardstock. the stickers are br sticker sheet dog words, creative imaginations 12x12 sticker sheet br dog bites and karen foster resin rounds br pets stickers. bellow are the lo's i made from this new stash. i often make my own frames, what i do is when ever i buy frames i make a template of them so i can make my own frames in future, using up my pattern paper scraps and cardstock scraps. i also do this for making my own tags. the adhesives i use are, double sided tape, glue dotes ( for attaching buttons), and sticky foam squares mini.( i hate glue its too messy). thanks for reading my blog, and for the lovely comments. xx4 legged friend
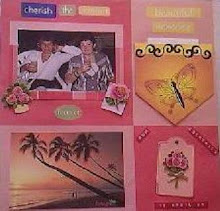
 this lo was made using, striped orange & brown scrapbook paper, and a hot off the press acetate overlay (DOG). , i attached the acetate to the paper using, silver heart brads top right of page. and bottom left of page. then added red bottons in the middle. i used metal charms for the lasey title. then mounted the big photo on to orange paper then on to black cardstock. stitching 3 bottons red & white to the corners of the photo. i made 3 slide mount frames using black cardstock, sticking photo's behind them. then i stapeled bits of ribbon on the sides of the frames.
then attached them on to the acetate using doublesided tape. last of all i added a pampered pet sticker underneth the big photo.
REBLE
 this lo was made using a dog buscuits/newspaper scrapbooking paper. the title reble, was done using my old metal alphabet charms. i mounted the photo's on to black cardstock. and added them to the page. the bottom photo was mounted on to grey cardstock first, i wrote a bit about reble on the side of the photo. added some stickers. and wrote out some words ( cute, clever, funny ect, on to grey card, cut the single words out, then using my whispers perminant pens( black) i inked the edges of the words, then added the words to the sides of the photo's. last of all i cut out the letter R from black cardstock and attached it to the page.
WOOF

for this page, i used a 12x12 dog words paper, for the background. added a 8x8 burgundy card sheet, in the centre of the page. attached a photo of my old dog lasey. added some doggy stickers. and last of all i made a flower, i traced the two flowers from the back of an old scrapbook mag, and made two card templates. drew around them, on to scraps of brown paper and on to red cardstock. then cut them out. added a left over piece of ribbon to the back. then attached the flower to the page with a big black brad. and curled the brown flower up a bit. lasey was such a good dog. i miss her so much.
THE DOG BONE TIMES.
 i enjoyed making this page, with my new papers & stickers. i used the dog bone times scrapbook paper, to mount a photo of my dogs, Tia & Seby, then added the border sticker( Treats) across the bottom of the photo. added a small photo of seby at the top of the page. i then stuck down a tiny photo of Tia on a piece of the dog bone times paper. middle right pic, then used my whispers perminant pen (red) to draw a border around the piece of paper. i added a tiny pic of seby bottom right. and made a square frame from black card, and attached that with lots of silver mini brads to embellish the frame as well as attaching the frame to the paper. last of all i added a few stickers to the bottom of the page. im quite pleased with the finished resalt.
Sunday 15 February 2009
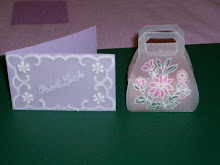
MAKE YOUR OWN JOURNALLING CARDS
 i decided to use up some of my card scraps, making my own journalling cards, as i can never find eny in my local craft shops. it was good fun making these. to make them i used my deckle edged scissors, buttons, cross stitch threads ( for the stitching). and my whispers permanent pens. i think they turned out pritty good. why not try making some for your self!!. thank you for reading my blog and for the lovely comments. Happy crafting crafters!!.
Friday 13 February 2009
MAKE YOUR OWN EMBELLISHMENTS
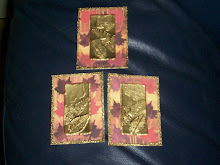
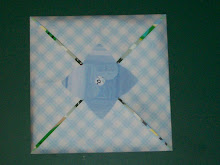
 Making your own embellishments, can be great fun, and is good for using up your old stash, and scraps of papers. and can be just the thing to go with your lo. here's my attemped of making my own. here ive used mini pastel brads, sticky ribbon, big flower brads, stickers, (a dragonfly peel off sticker, then stuck it on blue/green card scrap. i folded the wings up, then cut a square sticky foam pad in half and stuck it down on the underside of the dragonfly body, so the wings can fold up then attached it too the centre of the round card, the green & yellow ribbons were folded in half underneth the card and stuck down with double sided tape). i used a varity of deckle edged scissors to cut out the card shapes. Thanks for looking at my blog, why not try making your own embellishments!!, dont forget to use up those odd Alphabet letters too. xx
Saturday 7 February 2009
Shannon Rose

This is my niece shannon rose, when she was very young. ive always loved this picture of her, and just had to scrapbook it. for this page i used a plane pink 12x12 background card, i then tore a big piece of blue flower papermania paper, to leave a white torn edge at the top and bottom, i stuck the blue paper down, with double sided tape, on to the middle of the pink card. i then tore another piece of the blue paper top & bottom to make a thin border and stuck it down at the top of the page. i attached pink flower brads to the pink card at the top of the page , and also to the pink card under the photo, for decoration. i attached the photo on to some white card, and tore the white card around the photo, to leave a thin white border, then stuck that on to some pink card, and tore that around the white border, to leave a thin pink border. i stuck sticky ribbon down in the middle of the blue paper, then attached the matted photo in the centre. i added some heart die cuts to the sides of the photo. and a sheep die cut for the bottom of the page. i attached heart brads, to the oval tags, and attached the tags to the bottom of the page with mini pink brads. and to finish it off i stuck down a sticker ribbon, to the very bottom of the page. all the brads' paper & sticker ribbon are papermania. im very pleased with this lo i made today. and im still using up my old scrapbooking stash!, how cool is that!.
MARK & SUE'S WEDDING

This is a scrapbook page of my brother mark & sues wedding, it was a fantastic day, the weather was great too, i just had to scrapbook it!. for this page, i used a ribbon with congratulations on it, and stuck it down at the top of the page for added interest. i stuck down 8x8 size yellow papermania paper on to handmade white paper, then i tore the white paper around the yellow, to leave a soft white border. i attached the photo's at the top of the yellow paper. then stuck on the glasses & bells papermania glitter stickers, at the bottom of the page and in the middle of the page. i added a E-Z stick-on heart sticker, to the bottom of the page. and last of all to finish it off i added craft stickers autocollants, wedding dress' head dress & flower stickers. im so pleased with this lo, its fab.
Sunday 1 February 2009
The joy of Discovery
 here is a lo i done of my great niece roxanne, so far this year ive been realy good, i havent bought enymore scrapbooking materials. for my newyears resolution, i decided not to buy enymore, until ive used up what ive got. and believe me i have a lot. for this lo i used my green flower embossed paper, that i had for christmas, and stuck it down behind the photo, to highlight the colours of the photo. i attached the vellum saying to the green paper, using green eyelets. then threaded through green & blue thread, tieing them both in the middle to finish off. i used my dymo machine to type out the words, roxanne in the ballpool at flambards. and attached the words on the right side of the photo. last of all i used my old velvet alphabet stickers, to add the word fun, under the photo. i think the colours ive used, work realy well with the photo. this is one of my faverate lo's, so far.
Roxanne
 for this lo, i used up some of my old diecut shapes, i thought they looked too plane, so i used my glitter glues to highlight the letters on the block, on the dummy, on the duck and on the butterfly. then added them to the page. i attached a diecut of stars & moon under the photo, and used glitter glue on the word adorable, to make it sparkel. i stuck down alphabet stickers ,down the right side of the page, and used glitter glue on the letters too, with the name roxanne. i made the slider at the bottom of the page, using my cuttlebug machine, sliderdie and card scraps. i added a pink flower botton to embellish it. last of all i weaved through the papermania ribbon to attach the slider. then secured the ribbon to the back of the page. i love how much this page sparkel.
Roxanne & Ted

here is a lo , i made of my great niece Roxanne, the gold paper i had for christmas, was ideal to put behind the photo , to highlight the colour of the teddy. i used up some heart shapes i had and added baby brads, feet & hands to embellish them, and attached them to the corners of the photo. on the top and bottom of the page i used sticker ribbon, which i also had for christmas. the side panels are colour charts from a paint leflet, the colours were ideal for this page, i added flower brads & pink bottons to embellish it. im realy pleased with how this page turned out.
Subscribe to:
Posts (Atom)